Friday, April 26, 2013

Nick and Nora


The old Hollywood movie studios would team up an actor & actress to see if they could be successful and then continuously make movies with them. One pair made many successful films together some were dramas and others were comedies. The Hollywood movie couple...
Nick and Nora Charles with their dog Asta


                                                                                     William Powell & Myrna Loy


The series began in 1934 with the release of The Thin Man starring William Powell and Myrna Loy. They played Nick and Nora Charles, a retired private detective, his wife a wealthy heiress and their dog Asta. The two looked great together, they had great comedic timing and they just seemed to have fun. 
The first movie was supposedly filmed in 12 days out of the scheduled 14, and released a couple months after the book. The movie became a hit and the audiences began referring to Nick Charles as the thin man instead of the man he was searching for. The studio decided to stick to what the audience liked and so the rest of the films kept the title throughout the series. If you notice in the first film the couple truly enjoy their liquor and drank and drank, until later in the films they become parents. The studio could not have drunk parents, so they toned it down...a little. The couple had such a following that the audience actually thought they were married and so the actors would at times sign in at a hotel room as Mr. and Mrs.. 

There are a total of 6 films in the series-
  • The Thin Man (1934)
  • After the Thin Man(1936)
  • Another Thin Man(1939)
  • Shadow of the Thin Man(1941)
  • The Thin Man goes home(1945)
  • Son of the Thin Man(1947)
Sweet and Witty


Reporter: Say listen, is he working on case?
Nora Charles: Yes, he is.
Reporter:  What case ?
Nora Charles:  A case of Scotch. Pitch in and help him.


Nora Charles: How many drinks have you had?
Nick Charles: This will make six Martinis.
Nora Charles: (to the waiter) All right. Will you bring me five more Martinis, Leo? Line them right up here.


How to make a Nick and Nora Martini -
1 1/2 oz. Gin
1/2 oz. Dry Vermouth
Pour into a mixing glass filled with ice and stir well. Strain into a chilled Martini glass garnished with an olive and serve. Drink responsively, please.

Set the tone and buy a vintage Martini set to serve your drinks. I personally don't care for Martinis, but I love a bit of the bubbly. If either one is not an option, a good old Shirley Temple is still fun!
Place a couple of fancy Silver balloons, wear comfortable Silk P.J's and drink a beverage of your choice in fancy vintage glasses. Sit back and have a wonderful, witty line filled night with Nick and Nora Charles...oh, and Asta!

Wednesday, April 17, 2013

Scrap rug tutorial

Do you ever just walk in to your home and it just hits you..This room needs a makeover!  I did just that, to my kitchen. I knew exactly what I wanted to do, but with little cost as possible. I wanted to repurpose as much as I could from any leftover materials from other home projects. I bought a nice bright plaid to re-upholstery my kitchen chairs & make curtain toppers. I used the scraps to make my rugs. This is my tutorial for making the rug. I hope that you find it easy to follow and make.

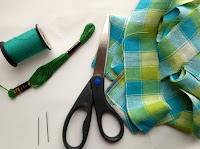
Materials needed

You will need-
  • Scraps cut into 2-3 inches wide & about a foot long
  • Embroidery floss
  • 1 Embroidery needle- This needle & floss are thicker & sturdier
  • 1 sewing needle
  • Thread
  • Scissors
  • Safety pin

Use safety pin to hold three of your scraps & use thread in matching color to sew ends together.


Braiding the scraps too loosely and the braid will open up when stepped on. If it's too tight your strands will not be flexible to sew and may pucker the center of the rug. You can use the safety pin and pin the sewn ends into something to hold it steady while you braid.


Once you have a  braid, roll into a round or oval shape. Pick one side to be the wrong side and sew your braid together only on this side.
Separate the floss into 3 strands and use the embroidery needle to sew the sides of the braid together. Stop a couple of inches before the end of the scraps. 
To lengthen your scraps use the another scrap and sew the ends together with thread and needle. Keep adding & sewing scraps together till its long enough to continue making your rug.


Keep repeating the process...
  • Sew the sides of the braids with embroidery needle & 3 strand width floss.
  • Stop a couple of inches before getting to the ends of scraps.
  • Using sewing needle & thread sew scrap ends together to lengthen.
  • Braid scrap strands.
Repeat till you have the size of the rug you would like.


Scrap rug    


Once you have achieved the size you would like, sew the scrap ends together and tuck carefully into braid. Use floss to sew side braids together. Place the rug on the ground to check if there are any gaps as you see here. Use your floss and sew the gaps shut. It may pucker in the center if the braids are to tight, but don't worry it will go down in time. If you wish you, you can hot glue a non-slip backing to the wrong side. Wash in gentle cycle. 
Once you get the hang of this your going to find yourself looking at old t-shirts, jeans or sheets as possible scraps. You can make the rugs match your rooms color schemes. Go for it and make the rugs wider. Go small to make coasters & potholders. Mix small oval shapes with circle shapes to make funky rugs or placemats. Whichever it is you choose to make, I hope that you enjoy yourselves while being creative and saving money.

Friday, April 5, 2013

Mending (3)

Vintage Clothes


I would like to wear my vintage clothing and use my vintage housewares for as long as I can and if possible pass them on to my children. I try my best to care for them and if I could, I'd plastic wrap them like a 70's sofa's. I have a couple guidelines that I use to care for my vintage and maybe they will help you out as well.


Clothing-
  • Washing-I wash sturdy cotton by hand with 1/2 a teaspoon of Woolite in a tub filled with enough cold water to cover the garment. Swish it around gently and rinse twice, pushing the water out by hand. Do not wring, it may weaken the fibers and will add creases.
  • Drying-Gently pull into shape. You can place on sweater rack, hang at the waist on rounded plastic hanger indoors or hang upside down at the seam on outside wash line. Make sure you clean off the line before hanging,weather could dirty the line and you'll end up washing all over again. Be careful not to hang in direct sunlight, it's nature's natural bleaching system. If it's all white..Perfect! I do hang my kitchen cloths to lighten stains. Due to my allergies, I do not hang my clothes outdoors.
  • Ironing- I check on the inside seam how it will take the iron. I put on lowest setting possible, iron inside out, & only spray lite starch on pleats. If you still have concerns try a light cotton cloth between the garment and the iron. While I iron, I do a search  and sew. I look for any mending that needs to be done, loose buttons, small holes or uneven seams, etc.. 
  • Storing- If you hang in the closet, use rounded, non-slip hanger. Use pant hanger, bring together the seam on the pants if it has one and then clip at the waist. Fold sweater, so they don't lose shape or end up with hanger crease at the shoulders. 
  • Silk,Rayon,Crepe or Chiffon- I will take these to the dry cleaners. If you do take them to the cleaners. speak to them before hand and express any concerns you may have. It's your clothing after all, just keep in mind that they may refuse to take the garments and avoid the risk. If they don't take the garment, ask them what they would recommend for cleaning. If you are able to go back to the vendor you purchased the garment from ask them how they cared for it.
  • Wool, Angora,Cashmere-Unfortunately, I can't tell you anything about how to care for them. My allergies prevents me from wearing them, which is annoying, since I've had to walkaway from some beautiful sweaters.

Handbags-
  • Patent- I use a drop or two of Woolite in a cup of water. Dampen a soft cloth, lightly scrub and dry. I do use a hand lotion(Perfect Purity advanced lubricating lotion is very light & costs a $1)  to keep the bag from drying out. Do a patch test & make sure that if you do wish to try the lotion, that it has no Vaseline or heavy oils or it will get sticky.
  • Straw or wooden-I usually make a homemade olive oil furniture cleaner, but I don't use it here due to the lack of scent. I use a light colored soft cloth with lemon oil and wipe till no dirt is visible on cloth. lemon oil will also freshen up the look and smell.
  • Beaded-If it's sturdy, then use a baby hairbrush very lightly dampened with warm water & pat dry. The baby brush bristles are soft and you'll cover a wider area than with a toothbrush, so you won't loosen beads with excessive brushing.
  • Cloth-I know some say to spot clean, but I have had some trouble with this. The area that I spot clean will be brighter than the rest of the purse, so I'll clean the whole thing.Use the baby brush and Woolite mix to  wash the area. Then immediately dry with towel and stuff the purse, not too tightly with a towel to retain its shape while drying.
  • Storing-I roll my scarves that are out of season and place inside my handbags to help them retain their shape. I will also color coordinate my scarves to the purse, this way I can find them easily when needed. if you prefer to use paper, make sure it's white tissue & not newspaper.The ink could stain the purse

Hats- There are some hats that can be tricky to clean since some can have very intricate folds or pleats. If you don't wish to risk it, you could try a flower, veil, feathers or a big flashy brooch to hide a stain or a small hole.
  • Cleaning-I use a q-tip on tiny spots or I spray a cloth with plain tepid water and dry immediately. I did read that placing the hat at a distance from a steam machine while lightly rubbing a cloth will loosen dirt. I don't have a steam machine yet, I will try this as soon as I can.
  • Storing-If you plan on using a hat box make sure to use white tissue paper to help keep its shape. No newspaper, ink will stain. Don't stuff too many inside a box, let them breathe.If you plan on displaying them on the wall or shelf make sure you bring them down from time to time. Dust with a soft bristle brush and keep out of direct sunlight to avoid fading.

Shoes-
  • Patent-I use a magic eraser on scuff marks or I place a little lotion on the spot and scrub in a circular motion till it's gone.
  • Cloth- Use Woolite solution, a brush and then pat dry with towel till all water is absorbed. If they get a little more soaked than you would have wanted, stuff the shoe with wash cloths & place upside down on a towel in front of a fan or on top of the dryer.
  • Leather-I use a cleaner that's made especially for leather shoes.
  • Storage-I separate my shoes from light to dark in 3 different areas in my bedroom to know exactly where a certain shoe will be. I place my older more fragile shoes that I only wear on a special occasion in a vintage suitcase. In a long see thru. plastic container under my bed, I will place my favorite shoes that I know go with my outfits.The closet holds my everyday casual shoes that wear around the house or do yard work in. I use the closet for these shoes,because it makes it easier for the hubs and I to just toss them in and not care what they touch. If you want to stop shoes from caving in, use shoe retainers or rolled hand towels. 
Gloves, Scarves & Stockings-
  • Cleaning-These should definitely be washed by hand. They are made of very fragile fibers and are used almost everyday, so they won't stand up to a harsh wash. A quick swishing around in a tub and hang dry on a laundry octopus(available at IKEA) or on a sweater rack. Don't forget to do a search and sew.
  • Storing-Gently roll the stockings from the toe to the thigh and place in drawer  lined with tissue paper to avoid getting caught on anything. Scarves fold in half, roll and so that if it has a design you will be able to see it and avoid tossing about.
  • Gloves have specially made hangers the go inside the gloves to keep their shape and hang. I have a three turtle clip tree that I use for my gloves, I'm not sure if it's supposed to be for gloves, but it works.I also place my gloves over a matching handbag, so that I can just grab and go.
    Turtle clips
    The things that I do to care for my vintage items have worked for me and some may work for you. Maybe not all, but they could be a starting point for you. Remember, you know your items better than anyone else, so what you choose to do to them is your decision. 

    Read everything- Clothing labels, books, other blogs, soap instructions, etc.. The more information you have, the more you have to fall back on if something were to come up unexpectedly.
     
    Test run- Always do a patch test. Try to remove a small piece from your vintage item and test how it will handle. If you can buy a similar piece of material at the local fabric store, then use that to try the  method of your choice on it. Just remember that it will not react in the exact way as the vintage material. The older one has years of wear and possibly tear, so you must consider that as well.

    Decide- It's your it decision in what to do, how to do it or even if you want to do anything at all. You bought the the item and you know what its value means to you. It may be financial value or it maybe an emotional value. Either one, it will be difficult to decide or maybe you just take a deep breath and go for it.
     
    Whatever method you may choose to care for your vintage items, just remember that the things you do are so that you may be able to enjoy them for as long as you can.